
Making a 360° rotating sketch head
Turning a pencil portrait through a full circle with a video model, four reference drawings and $2.80 of Replicate credit.
Published
Notes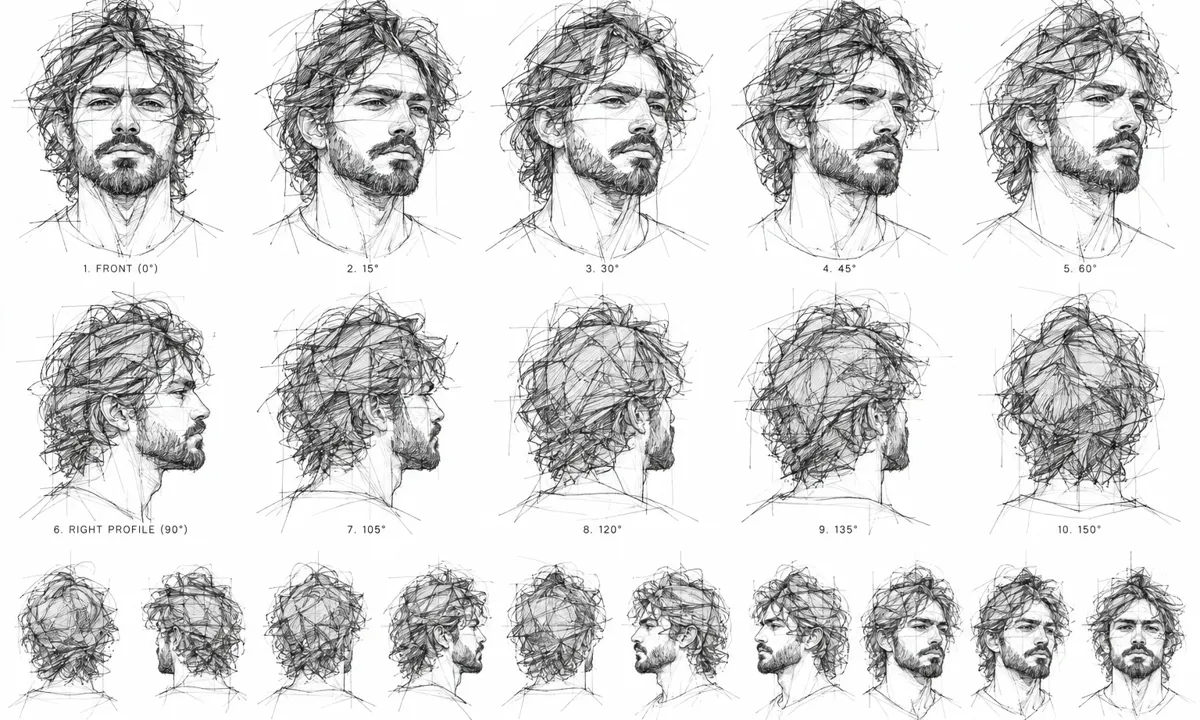
This is a short writeup about making a looping video of a pencil-sketch portrait rotating through a full 360°. The idea came from pitchprotocol.vc, which has a very cool looking rotating head on their landing page. Theirs is a 3D model, and the style is a sketchy, unfinished type of art where you can still see the construction lines. I wanted to find out if the same effect could be done with a video model and a few drawings instead of a 3D pipeline. What follows is the quick and cheap version, not the best possible one. Everything here was done in an afternoon and for a couple of dollars, and at almost every step there is a more careful option available if you want to spend the time.
The budget was $10, which is the smallest credit purchase Replicate
allows. Everything runs on Replicate using
kwaivgi/kling-v2.5-turbo-pro, which produces 5-second, 1440×1440 clips at
$0.35 per prediction.
A full rotation is four of those clips, so one version of the head costs 4 × $0.35 = $1.40. I made two: a pen-and-ink scribble and a graphite pencil version, drawn from the same reference set. That is where the 8 × $0.35 = $2.80 comes from, two styles at four transitions each rather than a single 360 costing eight predictions.
First attempt: one prompt for the whole rotation
The first thing I tried was the obvious one: give the model a single image and ask it to rotate the head a full 360°. I also gave it the rotating head video from the pitchprotocol site as a reference video, on the assumption that handing the model the exact motion I was after would keep it on track for the whole turn. The result looks like this:

The first two frames are fine. After that the drawing falls apart. The construction lines and the loose scribbled strokes disappear, and the hair turns into smooth, rendered, almost photographic shading. By the time the head comes back around to the front it is no longer the same drawing, it is a greyscale render of a person. The model has no reason to keep the sketch style once it is past the frame it was given, so it drifts towards what it normally produces. The reference video did not help with this. It describes how the head should move, but nothing about it says anything about how the drawing should look, so the motion is roughly right while the style still collapses.
There is a second problem visible here too. Nothing in the input tells the model what the back of this head looks like, so it invents one, and it is not consistent with the front.
Second attempt: pinning both ends of each segment
Instead of asking for the full turn in one call, we split the rotation into
four 90° segments and gave the model a start and an end image for each one.
Kling accepts both as start_image and end_image, which means every segment
is anchored at both ends by a drawing we chose, and the model only has to fill
in the quarter-turn between them.
A single pinned segment, right profile to back, looks like this:

The scribble holds the whole way through. The construction marks and the crosshair guides are still visible in the last frame, the line weight does not change, and the head that arrives at the back is the head we drew, not one the model made up. This is the same model and roughly the same prompt as the failed attempt, the only difference is that the far end of the motion is pinned.
The reference images
This needs four drawings of the same head, spaced around the turn: front, right profile, back, and left profile.
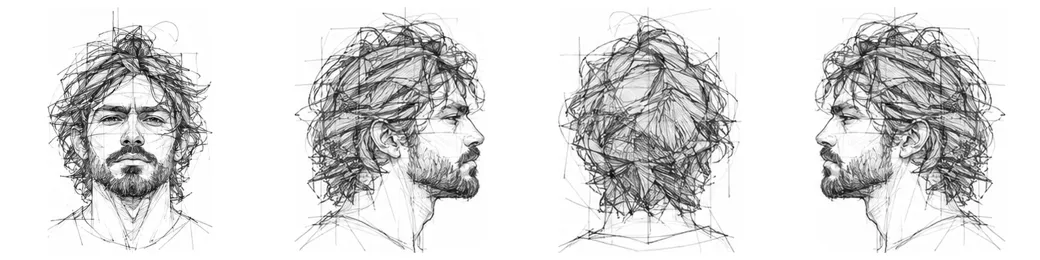
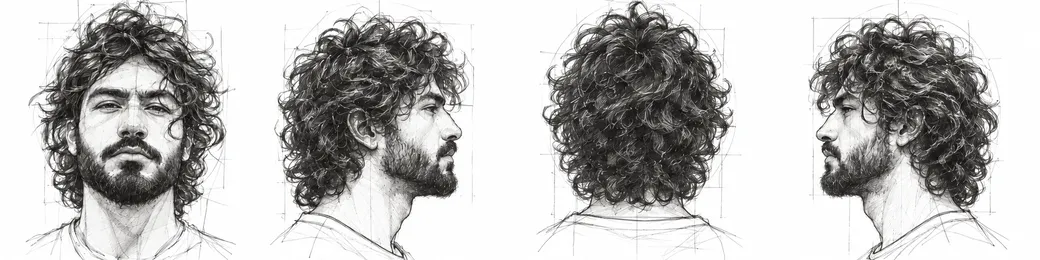
The four images become four transitions:
| clip | start image | end image |
|---|---|---|
| 1 | front | right profile |
| 2 | right profile | back |
| 3 | back | left profile |
| 4 | left profile | front |
The images do not need to show every angle, that is what the model is for. They do need to be large enough to hold up at the output resolution, consistently framed, and drawn in the same style. One thing that was not obvious at first: the more clearly different two neighboring poses are, the better the result. If two anchors look too similar the model does not know which direction it is supposed to turn.
Generating the four transitions
Each transition is one prediction, passing the matching pair of reference images:
B.api(f'{API}/predictions', tok, {'version': ver, 'input': {
    'prompt':      prompt,
    'start_image': start_image,
    'end_image':   end_image,
    'duration':    5,
}})
With both ends pinned there is not much left for the prompt to do, which is the point. It only needs to establish the direction of the turn and protect the drawing style. The language I used keeps the head still as an object, so no blinking, no expressions, and no other facial motion, and asks for the pencil or ink lines, the construction marks, and the white paper to remain visible throughout. Leaving out that last part is what produced the rendered hair in the first attempt.
For the two transitions that cross the back of the head, it also helps to state that the complete back of the head should appear at the midpoint. Without it the model sometimes takes the shorter route.
Running the four transitions for each of the two styles is eight predictions total, which is where the $2.80 comes from.
Stitching the clips
Each transition starts or ends on one of the same reference images, which means two consecutive clips both contain that pose. When the clips are joined this duplicates the endpoint for a frame or two and causes a visible stutter at each quarter-turn. Trimming those duplicate frames before concatenating is enough to stitch without a visible stutter.
Once the trimmed clips are concatenated into chain.mp4, the chain is four
segments of five seconds each, so it needs to be retimed into a five-second
loop with FFmpeg:
ffmpeg -i chain.mp4 -vf "setpts=PTS/4,fps=24" -c:v libx264 -crf 16 loop-5s.mp4The setpts=PTS/4 is the retime, changing that value gives a different loop
length.
Results
Pen-and-ink scribble:
Graphite pencil:
These are the same clips running in the header of this site.
Both outputs are 1440×1440. The main quality decision turned out to be the reference-image set rather than the prompt. Four clear, consistent poses keep the model close to the drawing during the entire rotation, and most of the problems along the way were problems with the anchors, not with the model.
These results are good enough for what I wanted, but they are the result of about an afternoon of work and eight predictions, and it shows if you look closely. If you are willing to spend more time and a bit more credit, there is a lot of room left:
- Draw more anchors. Eight images at 45° instead of four at 90° means the model has to invent half as much motion per segment, and the style holds even better. It doubles the number of predictions, so eight transitions per style instead of four.
- Re-roll the bad segments. Each prediction is $0.35 and they are not all equally good. I kept the first usable result for each transition. Generating a few per segment and picking the best one is the cheapest quality improvement available.
- Spend longer on the reference drawings. Since almost all of the quality lives in the anchors, making them more consistent with each other, in framing, line weight, and lighting, pays off more than anything done later in the pipeline.
- Clean up the seams properly. I trimmed duplicate frames, which is enough to remove the stutter. Actually cross-fading the joins, or matching the frames on either side more carefully, would hide them completely.
I did not do any of this, because the point of the experiment was to see whether the effect was reachable at all without a 3D model. It is, and it costs about three dollars. Going from there to something genuinely polished is mostly a matter of patience.